Hello, my soon-to-be tech-savvy, perfectly imperfect pals! Whether you’re an iOS aficionado (because once you go Apple, you’re in forever) or a die-hard Android lover, we’re about to plunge into the fascinating world of iPhone accessibility settings.
Brace yourselves (I know many of you are already braced, literally! 😂) for a journey of discovery because we’re not just exploring settings you didn’t know you needed but also ones that have the power to revolutionize and enhance the lives of anyone living with a disability and anyone who wants to use their smartphone more effectively.
These ‘life-changing’ smartphone hacks aren’t just incredibly useful; they’re as simple to put into action as sending a text. So, are you ready to embark on this tech-savvy adventure with me and begin simplifying life, one setting at a time? Okay then, let’s do it!”
1. HAVE YOUR PHONE READ TO YOU
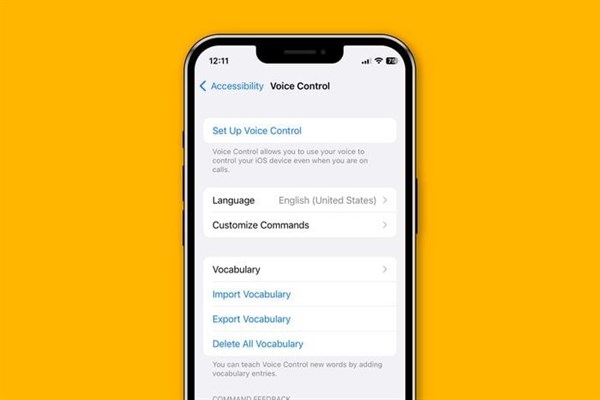
Are you tired of squinting at tiny text and feeling like your hands are secretly plotting against you? Fear not, because your smartphone can save the day, even if it doesn’t wear a cape.
Imagine your phone becoming your personal storyteller, reading your text messages, emails, and even the latest gossip from the newspaper out loud. It’s like having your own pocket-sized audiobook narrator!
Spoken Content enables your phone to speak words, letters, and emoji descriptions — even as you type them. You can choose voices for different languages and the speaking rate. You can also add the pronunciations of common words or names.
How To Set-Up Voice Over:
- Go to “Settings”
- Scroll down and select “Accessibility.”
- Tap on “VoiceOver” under the “Vision” section
- Toggle the switch to Enable VoiceOver. You’ll receive a prompt to confirm the change.
2. TURN YOUR PHONE INTO A MEDICAL ID BRACELET
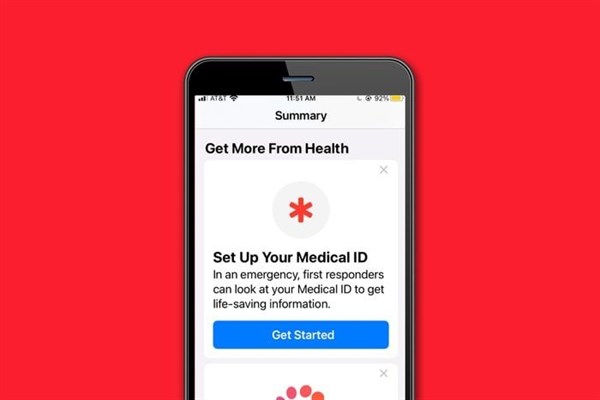
Did you know that your smartphone can be transformed into a lifesaving medical ID bracelet? While it won’t adorn your wrist with diamonds, it can provide vital information in an emergency.
Thanks to the Medical ID function, medical professionals can swiftly access crucial details about your chronic condition, disabilities, prescriptions, and medical history directly from the lock screen.
When your phone is locked, only the information you make accessible here is visible to those around you. Therefore, it’s essential to configure your phone to display your Medical ID and emergency contacts on the lock screen.
Let’s first set up your medical ID and then ensure that your info can be accessed on a locked screen.
How To Set Up Medical ID & Enable Lock Screen:
- Open the “Health” app on your phone (you can type “health” using “Search” or say, “Siri, open my health app”.
- Click on the Summary tab
- Tap on the profile photo of yourself in the upper right-hand corner.
- Tap Medical ID and edit it by filling in any important details you choose.
- Make sure to enable the slider that says “Show When locked” so that emergency personnel can access your info.
- After set-up, you can click on the “Browse” button at the bottom of the screen to fill out, track, and edit any category you choose.
3. SHAKES, TAPS, & GESTURES
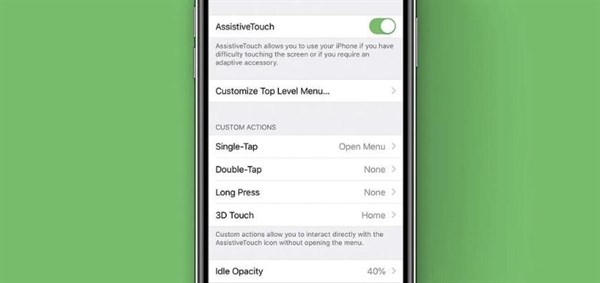
Did you know that you can set up your smartphone to perform tasks using simple taps and gestures? They’re like accessible shortcuts for getting things done.
You can create custom gestures for various tasks, such as adjusting the volume by swiping instead of using buttons, or by replacing the pinch-and-zoom gesture with a tap.
My personal favorite is being able to tap the back of my phone twice to take a screenshot! Also, the ‘Shake to Undo’ feature can be a lifesaver if you’re like me and tend to press the wrong buttons often.
Okay, are you ready to set up customized gestures on your iPhone:
How To Set Up Custom Gestures
- Go to Settings.
- Scroll to the “Accessibility” tab. It might be under “System” or something similar, depending on your phone.
- After clicking on the Accessibility tab, tap on the “Touch” and “Gestures” options.
- To erase a mistake in an email, a note, or a text message, activate ‘Shake to Undo’ under the touch tab, and voila, any mistake can be erased with just a shake of your phone.
- Select the gestures that work best for you and tweak the settings to your liking.
4. ONE-HANDED KEYBOARD
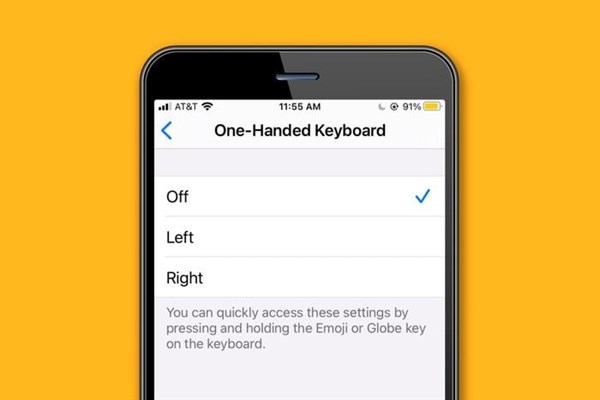
The iPhone’s one-handed keyboard is a valuable accessibility feature and a trusty sidekick for people with disabilities, ready to swoop in and save the day – or rather, the text message!
This keyboard option allows individuals with limited mobility or dexterity to type more comfortably and efficiently. By shifting the keyboard to one side of the screen, users can easily reach all the keys with just their thumb, making text input more accessible and reducing the need for complex finger movements.
How To Set Up The One-Handed Keyboard
- Go to Settings
- Scroll down and tap on “General.”
- Under the General settings, tap on “Keyboard.”
- Look for the “One-Handed Keyboard” option. It might be under the “Keyboards” or “Keyboard” menu.
- You’ll then see options to choose whether you want the one-handed keyboard to be left-handed or right-handed. Select your preferred side.
5. COMBAT BRAIN FOG WITH REMINDERS
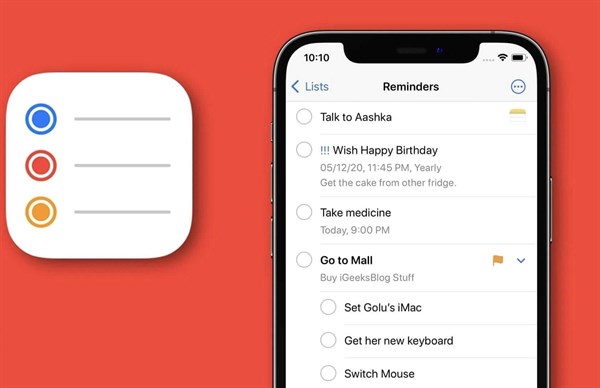
Picture this: You’re going about your day, and suddenly, a brilliant idea strikes you or a crucial task needs your attention. Whether it’s the spark of a groundbreaking invention or just a reminder that you’re out of paper towels, these thoughts can quickly vanish into the depths of brain fog. Fortunately, your smartphone offers several built-in tools to rescue you.
One of your best allies is Siri, your personal memory wizard. With a simple voice command like “Siri, please set a 30-minute timer” or “Siri, please remind me of this,” your iPhone springs into action. It’s like having your own mental butler, minus the fancy attire!
Apple has made “Hey Siri” voice commands seamlessly integrate with the Reminders app. Just say “Hey Siri, remind me to call my dad at 7 pm tonight,” and Siri has your back. It even understands recurring requests, like “Hey Siri, remind me to set my fantasy lineup every Saturday morning at 7:30 am.” It’s a straightforward yet powerful feature, thanks to the latest software updates.
Another option at your disposal is the newly improved Reminders app. To create a reminder, open the app, select “+ New Reminder” at the bottom left, and fill out the reminder details. Then, schedule when and how often you’d like to receive reminders. That’s it! The app will send you push notifications at the specified times.
But the Reminders app offers more than just the basics. You can mark certain reminders as high-priority with a flag, attach photos for extra context, and even add hyperlinks to websites or apps. This means you’ll be well-prepared to complete tasks swiftly once you receive your reminders.
Also, odds are you use the Messages app (iMessage) extensively throughout the day. You can make the Reminders app collaborate with it too. For instance, you can set up a reminder that triggers a notification when you’re messaging a particular person in the Messages app. So, if you’re chatting with your Mom or Dad, the Reminders app can prompt you to send a photo of your child (their grandchild).
Let’s set up these features so that you can help conquer brain fog and ensure that important thoughts and tasks are not lost in the shuffle.
Setting Up Siri with Reminders
- Activate Siri by saying “Hey Siri” or holding down the Home button, depending on your device.
- Once Siri is listening, you can give voice commands such as “Remind me to call my dad at 7 pm tonight.”
- Siri will confirm the reminder and ask if you’d like to set it. Confirm by saying “Yes” or tap the screen to confirm.
- To ensure Siri recognizes recurring reminders, simply state a command like “Hey Siri, remind me to watch new episodes of “The Morning Show” every Wednesday night at 8pm”.
Setting Up Messages with Reminders
- Open the Reminders app on your iPhone.
- Navigate to the specific task for which you want to receive reminders while messaging with a particular person.
- Tap on the task to open its details.
- Look for the “i” button (information) next to the task and tap it.
- In the task details, choose “Remind me when messaging.”
- You will be presented with a list of your contacts. Select the name of the person you want to associate with this reminder.
- Now, whenever you message the selected person, you will be prompted about the reminder you set. This feature helps ensure you don’t forget important tasks or messages when interacting with specific individuals in your Messages app.
6. LOCATE YOUR VEHICLE
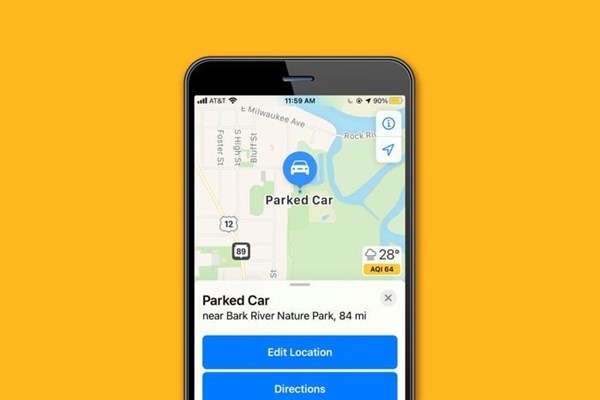
Who hasn’t experienced that moment of sheer panic when the once-familiar parking spot for your car becomes a mental maze? Be it in the labyrinthine parking lots of a concert venue or the sprawling expanse of an airport’s parking garage, the struggle to recall your vehicle’s location can feel like an eternity. And for those of us afflicted with the occasional bout of “brain fog,” well, even our own driveway isn’t safe from this forgetful whimsy! 😂
Of course, taking a snapshot of landmarks around where you park is a good idea, but even that can fall victim to forgetfulness. The good news is, that you can harness the power of your trusty smartphone to liberate yourself from this vehicular amnesia.
How To Set Up Vehicle Locator
- Make sure your iPhone is always connected to your car’s Bluetooth or CarPlay.
- Open the Apple Maps app on your iPhone.
- Once you’ve parked, a blue dot will appear on the map to show your current location. Tap on the blue dot. This will reveal a menu with options.
- One of these options will be “Add a Parked Car.” Tap it. Your iPhone will now remember where you parked.
- When you’re ready to return to your car, open Apple Maps again, and it will guide you back to your saved car location.
- You can use walking directions to follow the blue line back to your vehicle.
7. MAGNIFIER/ZOOM
For those of us with aging eyes (At age 53 I’m almost at 3.0 reading glasses! Ugh!) or vision impairments, squinting at tiny text on our smartphones can be a daily struggle. But, there are some things you can do and use to make reading text easier.
You can easily increase the font size to make the text more legible, which is like having a pair of reading glasses right on your screen!
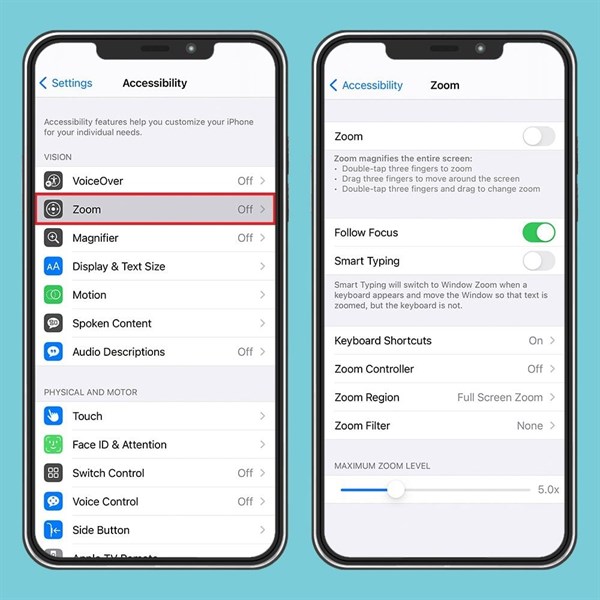
Or, you can use the Zoom feature. Zoom uses your phone’s camera to serve as a magnifying glass which can be a game-changer for anyone who needs a closer look at what’s on their screen. It’s also fantastic for reading small print on labels, menus, or even those elusive serial numbers. Here’s how to change font size and use Zoom:
To Increase Font Size
- Go to Settings.
- Scroll to Accessibility
- Find “Display & Text Size.”
- From there, you can adjust the text size to a comfortable level.
To Use Zoom
- Go to Settings.
- Go to Accessibility
- Choose Zoom.
- Once it’s activated, you can Zoom in and out using gestures. Zoom also has many options to configure contrast, invert colors, and highlight focus.
8. CONTACTLESS PAYMENTS
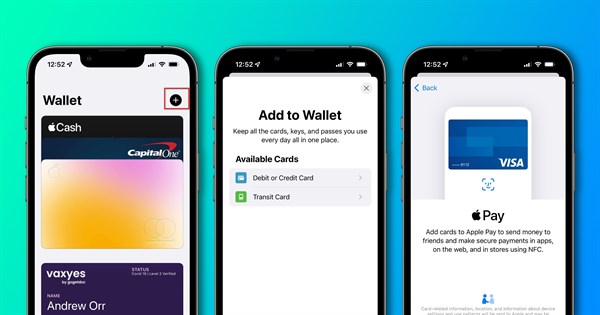
Contactless payments have revolutionized the way people make transactions, offering a convenient and hygienic alternative to traditional payment methods. But, for those of us with disabilities, this technology is especially empowering, as it saves us from having to fumble with cash and/or grip and swipe difficult-to-hold credit cards – allowing a level of financial independence and convenience that was previously challenging to attain.
One of the most popular contactless payment solutions for IOS users is Apple Pay, but you can also add credit cards (including your Starbucks card) to your virtual wallet. Here’s how:
To Set Up Tap To Pay
- Open the Wallet app by either swiping up or by saying, “Siri, open your wallet”.
- Tap on the “+” symbol to add a new card. You can choose to manually enter your card details or use your camera to capture the card information.
- Once your card is set up in Apple Pay, you can add your choice of Touch ID, Face ID, and/or a passcode got added security.
9. SLEEP BETTER BY TURNING YOUR PHONE INTO A WHITE-NOISE MACHINE & REDUCING BLUE LIGHT
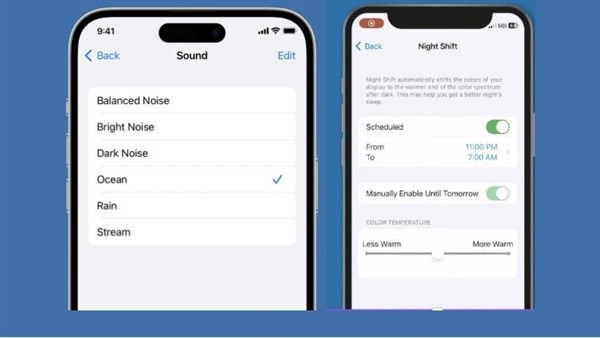
Living with a disability often involves coping with heightened stress levels, physical discomfort, or even pain. That’s why it’s crucial to rest when you need it and prioritize getting a good night’s sleep.
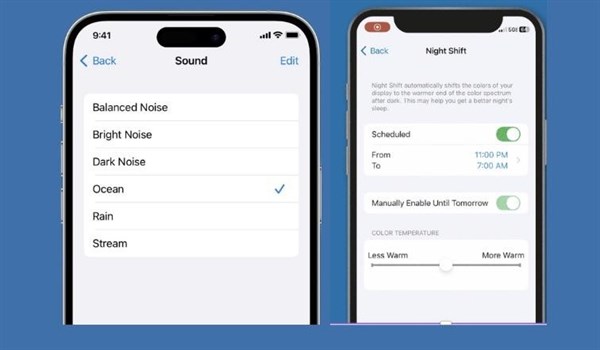
With the right settings, your smartphone can double as your super chill, Yogi type, best friend! It can transform into a portable white-noise machine that you can use to block out annoying sounds (eg. your husband’s snoring!) and create a place of calm.
You can also set yourself up for successful sleep with Apple’s “Night Shift” feature. Night Shift automatically adjusts the colors of your display to the warmer end of the spectrum, making the display easier on your eyes. It uses the clock and geolocation of your device to determine when it’s sunset in your location and then it automatically shifts the colors of your display to warmer colors. In the morning, it returns the display to its regular settings.
Night Shift can be enabled to reduce blue light which is proven to help prevent insomnia and eye fatigue and help you sleep better by signaling your nervous system to relax. Sweet dreams await! Here’s how to set up both the ambient noise and night shift features on your iPhone:
How To Set-Up Ambient Noise
- Open Settings.
- Scroll down, and tap Accessibility.
- Scroll down to the Hearing section, and tap Audio/Visual.
- Tap Background Sounds.
- Toggle Background Sounds on.
- Choose which sound you want. (There are three natural water sounds: ocean, rain, and stream. The other three choices—balanced noise, bright noise, and dark noise—are more atmospheric. Try them all out and see what feels best.)
- Set a volume for the sound.
Night Shift & Blue Light Feature
- Go to Settings.
- Click on Display & Brightness
- Press on Night Shift
- You will then see a screen giving you the ability to schedule a time for the Night Shift to turn on automatically and gives you a slider to adjust color warmth.
10. TURN YOUR PHONE INTO A TOOLBOX
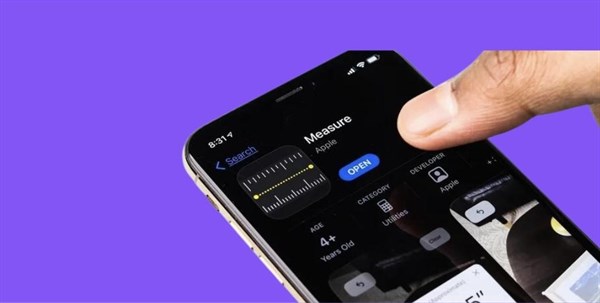
Your smartphone can be a very versatile tool, in the most literal way. Unfortunately, it can’t turn into a hammer, screwdriver, or a hot handyman, but it is packed with useful tricks that can be especially helpful for people with disabilities who want to make a few DIY projects easier.
Everyone needs some type of toolbox with a measuring device. You may have to measure an object or area, calculate a distance from wall to wall, or make sure that your photo gallery frames are level.
Taking measurements and making sure you hang photo frames straight has never been easier, since your phone can serve as a measuring tape and a carpenter’s level. The iPhone’s Measure app can even provide the height of a person fully in the camera frame.
With the Measure app, you can measure the square footage of a room, measure a package you’re sending, and even determine if the photos you want to hang on your family gallery wall are level.
Buying a new couch and unsure if it will fit where you want it? Instead of having to hold and maneuver a tape measure, (with an iPhone 6 and later models), you can get measurements right from your smartphone. Here’s how to use both features:
How To Use The Measure Feature
- Launch the Measure app
- Click on “Measure” on the bottom left side of the screen
- Your camera lens will open and you will see a white dot with an open circle around it.
- Move the white dot (by moving your phone) to the starting point of what you’re measuring.
- Tap the + button at the start and again at the end of the object or thing you’re measuring.
- Click on the top left bottom (which has dots with lines next to them) to reveal your measurements in inches, centimeters, and meters.
- You can save, send, and share your measurement photos for group projects.
How To Use The Level Feature
- Open the Measure app.
- Select Level on the bottom right of your screen.
- Place the side or bottom edge of the phone on the surface to measure.
- Select Level.
- As you tilt your phone, the angle is displayed in the center of the screen.
- When your item is level, the screen will light up green.
11. USE YOUR PHONE TO IDENTIFY THINGS
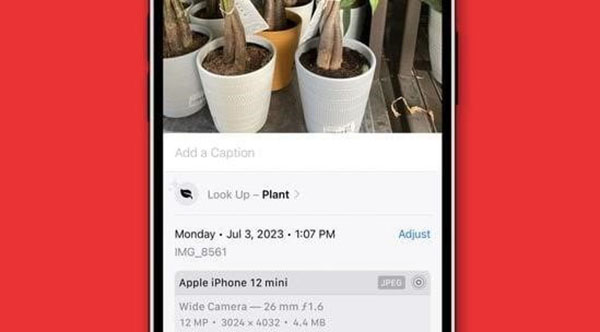
We’ve all had that moment of spotting a bird, a cool piece of art, or a book, and then taking a picture of it with all intentions of researching it later. But did you know that your iPhone’s Visual Lookup feature is like having a digital detective at your fingertips?
This super cool feature lets you point your camera at animals, objects, and landmarks in the real world and instantly get information about them. For example, aim your camera at a landmark, and it can tell you its name and history. Try it on a plant, and it’ll identify the species. It’s like having a nature expert on speed dial!
But here’s the real magic: Visual Lookup can be a game-changer for people with disabilities. It can help those with visual impairments by identifying objects, reading text, and providing valuable information about the world around them.
Visual Lookup is so good that you can even take a picture of an outfit you love, and it can help you find similar items online or in stores. Who knew your iPhone could be your personal shopper too? It’s like a stylish sidekick in your pocket! You’ve gotta use it right? Here’s how:
How To Use Visual Lookup
- Open your Camera app
- Snap a photo of something
- Open the photo and look for a small “i” icon with an open circle around it at the bottom.
- If the circle around the “i” is filled in with two small stars at its top-left corner, you’re in luck. Visual Look Up information is available for that photo.
- Bonus tip for photo organization, tap on the “i” to also add captions, names, and locations to all of your photos so you can easily find them in the future.
12. GET LIVE CAPTIONS IN REAL TIME
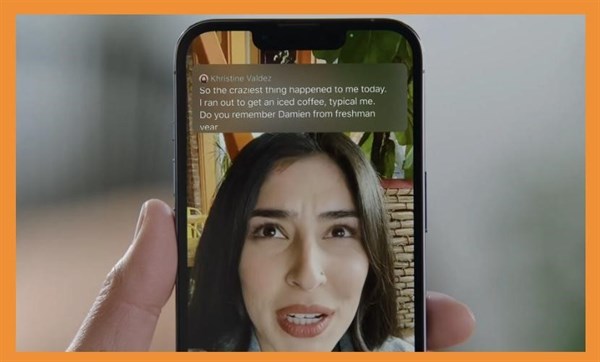
Speaking of captions, if you have difficulty hearing or understanding what is being said on video calls, did you know that Apple recently introduced an innovative Live Video Caption feature that’s a game-changer for everyone, especially those with disabilities?
With Live Captions, spoken dialogue is turned into text and displayed in real-time on your iPhone screen. You can more easily follow the audio in any app, such as FaceTime or Podcasts, and in live conversations around you. It’s like having your personal live subtitle generator.
When activated during a video call, Facetime, or while playing a podcast, Live Video Caption can instantly transcribe spoken words into text on the screen. It ensures that individuals with hearing impairments can fully participate in conversations or enjoy videos without missing a beat.
**Note that Live Captions are only available on iPhone 11 and later when the primary language is set to either English (U.S.) or English (Canada).
How To Set Up Live Captions
- Go to Settings
- Click on ‘Accessibility’
- Scroll down to ‘Live Captions’
- Enable ‘Live Captions (Beta)’
- Then, tap on ‘Appearance’ to customize the text, size, and color of the captions.
- Live Captions on your iPhone automatically transcribes the dialogue in apps or around you.
- To get live captions only for certain apps like FaceTime enable ‘In-App Live Captions’.
13. TEACH YOUR PHONE TO RECOGNIZE KEY SOUNDS
Have you ever missed a doorbell ring? Your child or grandbaby crying in the next room? Is the dog barking to go out? You can set your phone to listen for specific sounds and alert you! Pretty cool right?
Go to Settings>Accessibility>Sound Recognition>Follow the Prompts.
14. USE YOUR PHONE TO TRANSLATE
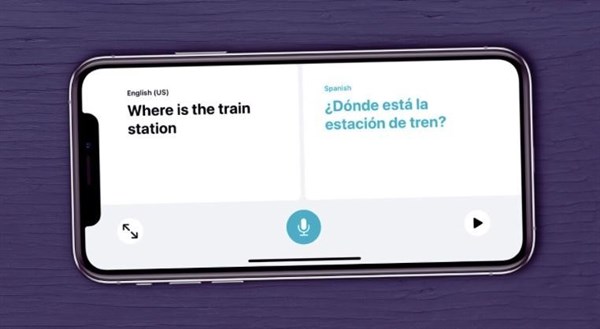
Need to communicate with someone who doesn’t speak English? No worries!
Imagine you’re a traveler with a hearing impairment exploring the bustling streets of Tokyo. You want to order from a local restaurant, but the menu is all in Japanese.
Thanks to the Translate feature on your iPhone, you can not only read the menu but also see the sign language interpretation for each dish, ensuring that everyone, regardless of their hearing abilities, can savor the local cuisine.
For someone with a visual impairment, the Translate app becomes their eyes in a foreign country. It reads aloud the foreign language text on signs, menus, or documents, allowing them to navigate and understand their surroundings with confidence.
Whether you’re Deaf, hard of hearing, blind, or have other disabilities, the Translate feature is a powerful tool that promotes inclusivity and accessibility, making the world more welcoming and easier to explore. It’s all about ensuring that everyone can experience the beauty and diversity of our planet, no matter their abilities or the languages they speak.
How To Use The Translate Feature
- Open the Translate app. If you can’t find it, swipe down on the app screen and type “Translate” into the search bar.
- Once in the Translate app use the pull-down menu on the top left of the screen to select your native language.
- From the pull-down menu on the top right, select the other person’s language.
- Next, either type in what you want to be translated or tap the microphone icon to say it. It will instantly be displayed in both languages.
15. TURN YOUR PHONE INTO A SCANNER
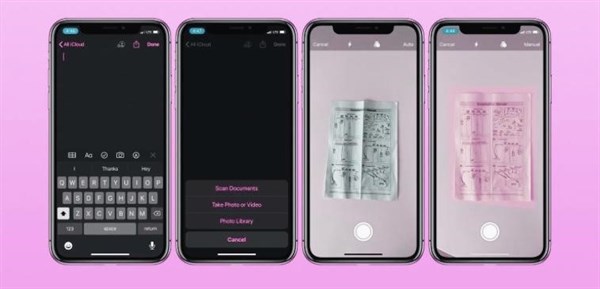
Imagine you’re a student, and you’ve got a pile of textbooks and handouts to review. Instead of struggling with small text or needing someone to read it for you, you can rely on your iPhone’s Scan feature. It transforms your device into a portable scanner, making all your reading materials accessible at the tap of a button.
If you have a visual impairment, the Scan feature comes to the rescue by using optical character recognition (OCR) to convert printed text into spoken words. It not only reads text aloud but also describes images and graphics, giving you access to visual content like charts and diagrams, enhancing your learning experience.
For individuals with dyslexia or other reading difficulties, the Scan feature allows you to adjust the text size, font, and background color, making it easier to read and understand text. It becomes your customizable reading companion, ensuring that you can engage with written content in a way that suits your preferences.
The Scan feature on your iPhone is like having a personal assistant, offering accessibility and convenience in the palm of your hand. It’s about leveling the playing field so that everyone can access and understand printed material effortlessly, no matter their reading abilities or needs. Here’s how:
How To Use The Scan Feature
- Open the Notes app.
- Hit the + icon at the bottom right to open a new Note.
- Tap on the camera icon and click Scan Documents.
- Line up the edges of your document with the edges of the yellow square that appears in your camera app.
- Once you’ve captured each page, you can adjust the scan if necessary and your phone will create a PDF you can save or share.


This list of hacks and tricks is gold, Lainie! I did not know about many of them and now have activated them on my iPhone. This is next level advocacy for our community (and anyone who needs a little help in the visual, audio or sensory department. Thank you for your time and ingenuity to share this with us!
💕💕 Thanks as always Reeve! It took me forever to put together, and I didn’t know most of them myself. 💕